
Table of contents:
HowToForYou.com – Modern vehicles rely heavily on safety systems that operate quietly in the background. One of the most important is the anti-lock braking system (ABS), designed to prevent wheel lock-up during sudden stops. When the ABS warning light appears on your dashboard, it often signals a problem with one of the sensors. In many cases, the issue isn’t a failure but simple contamination—dirt, debris, or metal particles interfering with the sensor’s accuracy.
This guide explains how to clean an ABS sensor effectively, with a focus on safety, precision, and long-term reliability. It also adds practical insights that go beyond basic instructions, helping you understand why each step matters.
Why ABS Sensors Get Dirty in the First Place
ABS sensors sit near the wheel hub, an area constantly exposed to road grime, brake dust, and moisture. Over time, microscopic metal shavings from brake components can accumulate on the sensor’s magnetic surface. This buildup disrupts the signal sent to your car’s control module, triggering the ABS warning light.
For You :
Unlike more complex mechanical failures, this is often a maintenance issue—not a replacement scenario.
Tools and Preparation
Before starting, gather a few essential tools:
- Car jack and jack stands
- Lug wrench
- Allen wrench (hex key)
- Pliers
- Microfiber cloth
- Canned air
- Safety gloves and goggles
Set aside about 30 to 60 minutes, depending on your experience and how many sensors need attention.
For You :
Step 1: Safely Access the Sensor
Start by parking your vehicle on a flat, stable surface. Lift it using a car jack at the manufacturer’s recommended jack points. Once elevated, remove the wheel by loosening and taking off the lug nuts.
With the wheel out of the way, you’ll have a clear view of the wheel hub, where the ABS sensor is typically located. Look for a small component connected to a wire—this is your target.
Pro tip: If you’re unsure which sensor is causing the issue, you can clean them one at a time and check if the warning light disappears after each attempt.
For You :

Step 2: Remove the ABS Sensor Carefully
Locate the bolt securing the sensor and remove it using an Allen wrench. If it’s stuck due to rust, applying a penetrating oil can make removal easier.
Gently wiggle the sensor free using pliers if necessary. Avoid pulling forcefully or prying from underneath, as this can damage the component or its wiring.
Keep the sensor connected to its wire—there’s no need to disconnect it.
For You :

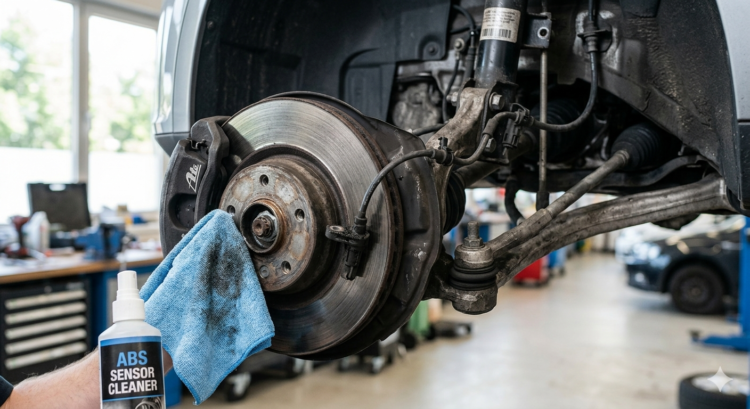
Step 3: Clean the Sensor the Right Way
Begin by using canned air to blow out debris from the sensor housing. Then, gently wipe the sensor with a clean microfiber cloth.
If you encounter stubborn grime or rust, use a soft wire brush with light pressure. The goal is to remove buildup without scratching or weakening the sensor.
Important considerations:
- Avoid harsh chemical cleaners—they can damage sensitive components
- Do not soak the sensor in water
- Ensure the sensor is completely dry before reinstalling
This step is quick but crucial. Even a thin layer of debris can disrupt readings.
Step 4: Reinstall and Test
Once clean, place the sensor back into its original position. Make sure it sits flush and secure it with the bolt. Reattach the wheel, tighten the lug nuts, and lower the vehicle.
Start your car and check the dashboard. If the ABS light is off, the cleaning was successful. If not, repeat the process for other wheels or consider further diagnostics.
When Cleaning Isn’t Enough
If the ABS light remains on after cleaning all sensors, the problem may involve:
- Damaged wiring
- Faulty sensor units
- Issues within the ABS control module
At that point, a professional diagnostic scan is the next logical step.
Extra Tips for Better Results
- Clean sensors periodically, especially if you drive in dusty or wet conditions
- Handle sensors gently—they are more delicate than they appear
- Keep track of bolts and lug nuts to avoid delays during reassembly
- Work methodically—rushing increases the risk of mistakes
Final Thoughts
Understanding how to clean an ABS sensor gives you a practical way to address a common warning light without immediately turning to costly repairs. More importantly, it helps maintain a critical safety system that protects you during emergency braking situations.
While the process is straightforward, attention to detail makes all the difference. A careful cleaning can restore proper function, extend the life of your braking system, and keep your vehicle performing as intended.
Read More: