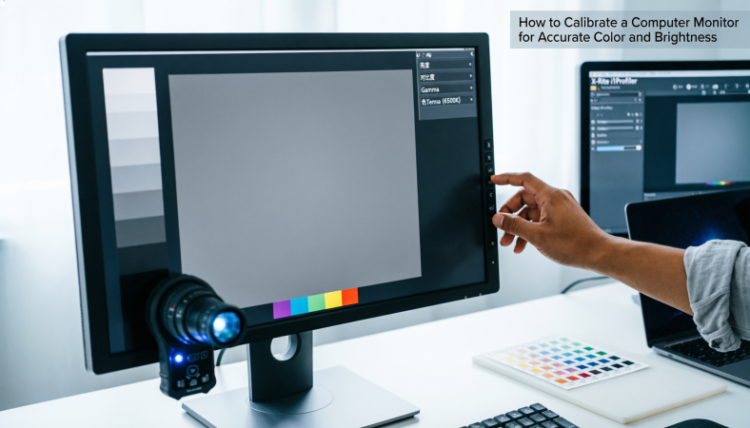
HowToForYou.com – If your work depends on what you see on screen, monitor calibration is not optional. Whether you edit photos, design marketing materials, or produce video content, inaccurate color and brightness can undermine the final result. A project that looks sharp on your display may appear dull, oversaturated, or washed out on someone else’s device.
Understanding how to calibrate a computer monitor properly helps ensure your work translates consistently across different screens and environments. Below is a practical, updated guide that goes beyond the basics and explains not just what to do, but why each step matters.
Why Monitor Calibration Is More Important Than Ever
Modern displays, especially 4K and wide-gamut panels, are engineered to produce vivid colors. Out of the box, many are intentionally tuned to look bright and punchy for showroom appeal. That might be fine for casual use, but it is rarely accurate.
For You :
Color accuracy becomes essential if you:
-
Deliver visual content to clients
-
Prepare images for print
-
Edit video for broadcast or streaming
-
Manage brand color standards
-
Work in digital marketing or product photography

Even small deviations in gamma, white balance, or brightness can shift skin tones, distort brand colors, or flatten contrast.
Step 1: Prepare Your Environment Before You Start
Calibration begins long before you open any software.
1. Let the Monitor Warm Up
Turn your display on and allow it to run for at least 30 minutes. Monitors stabilize as they warm up. Calibrating too soon can result in inaccurate settings.
2. Control the Lighting
Work in a room with neutral, steady lighting. Avoid:
-
Direct sunlight
-
Strong overhead glare
-
Color-tinted walls reflecting onto the screen
If possible, keep your lighting conditions consistent day to day. Calibration assumes a stable viewing environment.
3. Clean the Screen
Dust, fingerprints, and smudges can subtly affect perceived contrast and brightness. Use a microfiber cloth and appropriate cleaner before adjusting settings.
4. Use a High-Quality Connection
Whenever possible, connect your monitor via DisplayPort or HDMI rather than older connectors like VGA. A clean digital signal supports accurate color output.
5. Reset to Default Resolution
Ensure the display is set to its native, recommended resolution. Calibration only works correctly at the panel’s intended resolution.
How to Calibrate a Monitor on Windows
Windows includes a built-in calibration tool that provides step-by-step guidance.
-
Open the Start menu and search for “Calibrate display color.”
-
Launch the Display Color Calibration utility.
-
If using multiple monitors, drag the calibration window to the screen you want to adjust.
-
Reset your monitor to factory default color settings through the on-screen menu if you have previously changed them.
You will then move through several adjustment stages:
Gamma Adjustment
Gamma controls the relationship between brightness and midtones. Follow the on-screen example and adjust the slider until the image matches the reference as closely as possible.
Brightness and Contrast
Use your monitor’s physical menu buttons to fine-tune brightness and contrast. The goal is to preserve detail in both shadows and highlights without flattening the image.
Color Balance
Adjust the red, green, and blue sliders until grayscale bars appear neutral, without color tinting.
Once complete, compare your previous calibration with the new one before saving.

How to Calibrate a Monitor on macOS
Mac users can access calibration tools through System Settings.
-
Open the Apple menu.
-
Select System Settings (or System Preferences on older versions).
-
Click Displays.
-
Choose the Color tab.
-
Select Calibrate.

The built-in assistant walks you through brightness, white point, and gamma adjustments. For most users, the standard calibration mode is sufficient, but advanced users can enable expert mode for more granular control.
When to Use a Colorimeter for Professional Accuracy
If you work in photography, filmmaking, graphic design, or printing, software calibration alone may not be precise enough.
A colorimeter is a hardware device placed directly on your screen. It measures actual light and color output rather than relying on visual estimates. The device works alongside calibration software to build a custom color profile for your display.
For You :
Professional models, such as those from the Datacolor Spyder product line, are widely used in creative industries.
Why Hardware Calibration Matters
-
Removes human guesswork
-
Compensates for ambient lighting
-
Creates ICC color profiles for system-wide consistency
-
Maintains accuracy over time
To use a colorimeter:
For You :
-
Install the included software.
-
Plug the device directly into a USB port.
-
Place it flat against the center of your screen.
-
Start the calibration process and follow prompts.

The software measures multiple color patches and automatically adjusts your system profile.
How Often Should You Calibrate?
Professionals typically recalibrate every four to six weeks. Monitors drift over time, especially as they age. If color accuracy is critical, set a reminder.
Casual users may only need to recalibrate a few times per year.
Common Calibration Mistakes to Avoid
-
Skipping warm-up time
-
Calibrating in changing light conditions
-
Using overly bright showroom presets
-
Ignoring factory reset before starting
-
Relying on memory instead of comparison references

Calibration is about measurable neutrality, not personal preference.
The Bottom Line
Knowing how to calibrate a computer monitor ensures your colors appear consistent and reliable across devices. While built-in operating system tools offer a solid starting point, professionals should consider hardware calibration for true accuracy.
A properly calibrated display protects your creative work, strengthens brand consistency, and reduces costly revisions. In a digital landscape where visuals shape perception, accurate color is not just technical detail. It is a competitive advantage.