
Table of contents:
- Why Users Are Leaving TikTok
- Key Difference: Deactivation vs. Deletion
- How to Delete Your TikTok Account Permanently
- What Happens After You Delete Your Account?
- How to Temporarily Deactivate Your TikTok Account
- What If You Can’t Access Your Account?
- Alternative Method: Reporting Your Own Account
- Things to Consider Before Deleting
- Final Thoughts
HowToForYou.com – As concerns around digital privacy, screen time, and online identity continue to grow, more users are looking for ways to step back from social media platforms. Whether you’re planning a permanent exit or simply taking a break, understanding how to delete or deactivate your TikTok account properly is essential.
This guide offers a clear, updated approach to managing your TikTok presence, along with practical insights that go beyond the basic steps—helping you protect your data and avoid common mistakes.
Why Users Are Leaving TikTok
Before diving into the steps, it’s worth understanding why many users choose to delete or deactivate their accounts:
For You :
- Privacy concerns and data control
- Digital detox and reduced screen time
- Content fatigue or shifting interests
- Security reasons, especially after losing account access
Whatever your reason, TikTok provides both temporary and permanent account options.
Key Difference: Deactivation vs. Deletion
Understanding the distinction can save you from regret later:
- Deactivation: Temporarily hides your profile and content. You can return anytime by logging back in.
- Deletion: Starts a 30-day countdown. If you don’t log in during that period, your account and all associated data are permanently erased.
How to Delete Your TikTok Account Permanently
Follow these steps directly within the app:
For You :

- Open TikTok on your mobile device
- Tap your profile icon (bottom-right corner)
- Tap the menu icon (☰) in the top-right
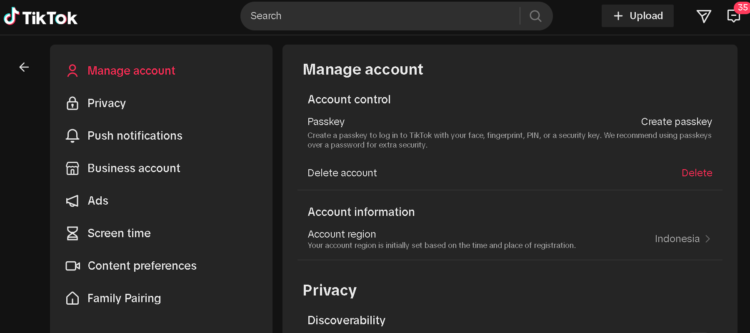
- Select Settings and privacy
- Tap Account
- Scroll down and choose Deactivate or delete account
- Select Delete account permanently
- Choose a reason (or skip)
- Confirm your decision and enter your password if prompted
Important Tip
Before confirming, download your data. Once deletion is complete, recovery is not possible.
What Happens After You Delete Your Account?
TikTok does not immediately erase your account. Instead:
- Your account enters a 30-day deactivation period
- During this time, your profile is hidden
- Logging back in restores your account instantly
- After 30 days, all data is permanently removed
This grace period acts as a safety net for users who may change their minds.
For You :

How to Temporarily Deactivate Your TikTok Account
If you’re unsure about leaving permanently, deactivation is a safer option:
- Open TikTok and go to your profile
- Tap the menu icon (☰)
- Select Settings and privacy
- Tap Account
- Choose Deactivate or delete account
- Tap Deactivate account
- Confirm using the verification code sent to your email
Your account will become invisible until you log back in.
What If You Can’t Access Your Account?
Losing login access doesn’t mean you’re stuck. You still have options:
For You :
1. Contact Support
Reach out through TikTok’s official support channels and provide verification details such as:
- Registered email address
- Username
- Proof of ownership
2. Request Account Removal
In some cases, accounts can be removed manually after identity confirmation.
Alternative Method: Reporting Your Own Account
This is less direct but sometimes effective:
For You :

- Ask trusted contacts to report your account
- Select appropriate reasons such as policy violations
If flagged successfully, TikTok may review and remove the account.
Things to Consider Before Deleting
- No refunds for in-app purchases
- All videos and followers are lost permanently
- Usernames may not be reusable immediately
- Linked accounts (email/phone) may still be associated temporarily
Taking a few minutes to back up important content can prevent long-term regret.
Final Thoughts
Managing your online presence is just as important as building it. Whether you’re stepping away for a while or leaving for good, knowing how to delete or deactivate your TikTok account puts you in control.
For You :

If you’re unsure, start with deactivation. It gives you space without burning bridges. But if you’re certain, follow the deletion process carefully to ensure your data is fully removed.
For You :