
Table of contents:
HowToForYou.com – In recent years, social media users have become more cautious about how much personal data they share online. TikTok, one of the world’s most popular video platforms, is no exception. Whether you are stepping away for privacy reasons, reducing screen time, or starting fresh, knowing how to delete a TikTok account correctly is essential.
This guide explains the full process in clear steps, highlights what happens to your data, and outlines important details many users overlook before removing their account.
Why People Choose to Delete TikTok Accounts
Users decide to leave TikTok for different reasons. Some want to protect their digital footprint, while others are concerned about data usage, content algorithms, or time management. Businesses and creators may also delete older accounts before launching new branding strategies.
For You :
Whatever the reason, deleting an account is a personal decision that should be done with full awareness of the consequences.
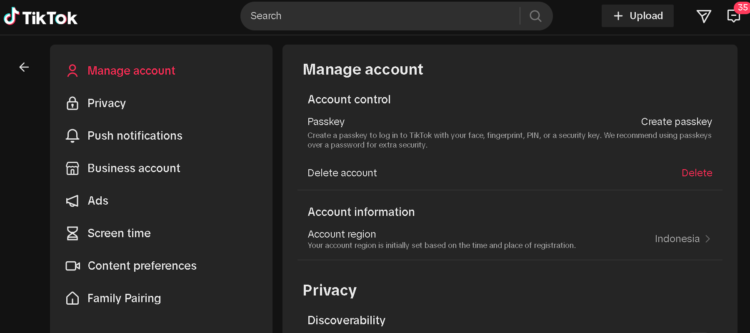
How to Delete a TikTok Account Step by Step
If you are ready to proceed, TikTok allows account deletion directly from its mobile app. The process only takes a few minutes.
Follow these steps:
- Open the TikTok app and log in to your account.
- Tap Profile at the bottom of the screen.
- Select the Menu icon in the top corner.
- Tap Settings and privacy.
- Choose Account.
- Tap Deactivate or delete account.
- Follow the on screen instructions to confirm your choice.
TikTok may ask you to verify your identity through a code sent to your phone number or email address before completing the request.
For You :
Deactivation vs Permanent Deletion
Before final confirmation, TikTok gives users two options:
- Deactivate account: Temporarily hides your profile, videos, and activity. You can reactivate it later by logging back in.
- Delete account: Permanently removes your profile, content, and access after the waiting period.
If you are unsure, deactivation is a safer short term choice.
What Happens After You Delete Your Account
Once deletion is requested, TikTok places the account in a deactivation period, typically lasting 30 days. During this time:
For You :

- Your profile will not be visible to other users.
- Videos and comments will disappear from public view.
- You can still cancel deletion by logging back in.
After the grace period ends, the account and its associated data are permanently removed and cannot be recovered.
How TikTok Handles Your Data
According to TikTok’s privacy policies, some information may be retained for legal, security, or regulatory purposes even after account deletion. This may include transaction records or data required to comply with applicable laws.
Users who want full clarity are encouraged to review TikTok’s Privacy Policy before proceeding.
For You :

Reporting Underage Accounts
If you believe an account belongs to someone under the platform’s minimum age requirements, TikTok provides tools for reporting underage users. These reports are reviewed to ensure the platform remains compliant with child safety regulations.
Account deletion in these cases is handled by TikTok’s moderation and safety teams.
Things to Do Before Deleting TikTok
Before removing your account, consider taking these steps:
For You :

- Download your TikTok data if you want a record of videos and activity.
- Save any content you may want to reuse elsewhere.
- Unlink connected third party accounts such as Instagram or YouTube.
- Cancel active subscriptions or creator tools.
Preparing in advance helps avoid losing valuable content permanently.
Final Thoughts
Understanding how to delete a TikTok account goes beyond tapping a few buttons. It involves knowing the difference between deactivation and deletion, understanding how personal data is handled, and preparing for permanent removal.
As digital awareness grows, platforms are offering clearer exit options for users who want more control over their online presence. Whether you are leaving temporarily or for good, following the correct steps ensures your decision is secure, informed, and final.
For You :