
Table of contents:
HowToForYou.com – Every time you open a website, launch an app, or run a simple search, your device quietly asks the internet where to find what you are looking for. This request is handled by the Domain Name System, better known as DNS. It translates human-friendly website names into numerical IP addresses so your device knows where to connect.
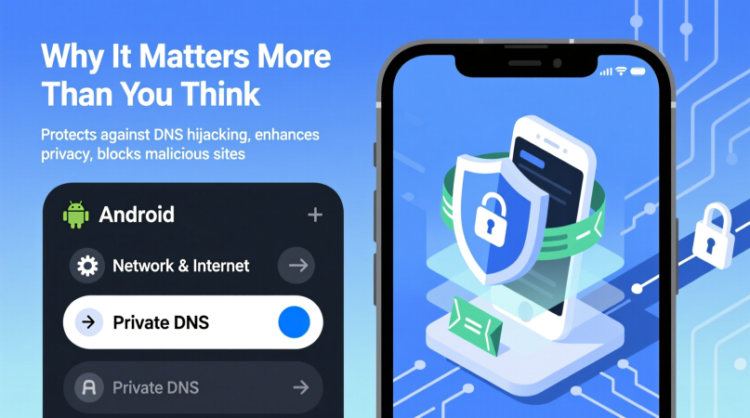
Most users never think about DNS, yet it plays a central role in online privacy. By default, many DNS requests are sent without encryption, which means they can potentially be read by others on the same network. Understanding how to enable Private DNS on Android is one of the simplest ways to reduce that risk and take better control of your digital footprint.
Why DNS Privacy Is a Real-World Issue
When DNS requests are not encrypted, they travel across the network as plain text. On a trusted home network, this may not seem alarming. On public Wi-Fi, however, the situation changes quickly. Airports, hotels, and coffee shops are common places where attackers monitor network traffic to learn which websites people visit.
For You :
Even if the website itself uses HTTPS, the DNS query can still reveal the domain name you requested. That alone can expose sensitive habits, work-related tools, or personal interests. Private DNS addresses this gap by encrypting DNS traffic so that even if someone captures the data, it is unreadable.
What Private DNS Does on Android
Private DNS on Android uses a technology called DNS over TLS. Instead of sending requests openly, your device establishes an encrypted connection with a trusted DNS provider. From that point on, domain lookups are protected in transit.
This does not make you anonymous, and it does not replace a VPN. What it does is close one of the most overlooked privacy leaks on mobile devices. For users who care about security but want a lightweight solution, Private DNS is a practical middle ground.
For You :

How to Enable Private DNS on Android 11 and Newer
On newer versions of Android, the process has shifted away from manual configuration. The most straightforward approach is to use a dedicated DNS app from a trusted provider.
A widely used option is Cloudflare’s 1.1.1.1 app, which bundles Private DNS with additional security features. After installation, enabling encrypted DNS is as simple as opening the app and turning on the service. Once active, all DNS queries from the device are automatically protected.
One quirk worth noting is that the app may not always appear in the app drawer when inactive. If that happens, opening it from the Play Store or tapping its notification is the quickest workaround.
For You :
How to Enable Private DNS on Android 10 and Older
If your device runs an older version of Android, you can enable Private DNS directly from system settings.
Start by opening the Settings app and navigating to the network section. Look for the Private DNS option, which may be listed under advanced or additional connection settings depending on the manufacturer.
From there, choose the option to specify a Private DNS provider hostname. This requires entering the address of a DNS service that supports encrypted queries. Popular choices include Cloudflare, Google, Quad9, and other security-focused providers. Once saved, your device will attempt to use that provider whenever it is available.
For You :

For users who prefer minimal configuration, the automatic option allows Android to fall back to a default secure provider when possible. Those who want more control often prefer entering a specific hostname.
Choosing the Right DNS Provider
Not all DNS providers offer the same balance of speed, privacy, and filtering. Some prioritize raw performance, while others focus on blocking malicious domains or adult content. Cloudflare is often favored for its speed and privacy policy, while services like Quad9 emphasize threat protection.
The key is consistency. A reliable provider ensures your encrypted DNS works across different networks, including places where default options may not be supported.
For You :
How to Confirm Private DNS Is Working
After enabling Private DNS, it is smart to verify that the connection is active. Many DNS providers offer diagnostic pages that report whether your device is using encrypted DNS. A quick check can confirm that DNS over TLS is enabled and functioning as expected.
Why This Small Change Makes a Big Difference
Learning how to enable Private DNS on Android is not about chasing advanced security tools. It is about removing an unnecessary vulnerability that most users leave open by default. The setup takes only a few minutes, yet it significantly limits what others can learn about your online activity.
In a time when mobile devices are used for everything from banking to work communication, protecting basic network traffic is no longer optional. Private DNS is a quiet feature, but once enabled, it works constantly in the background, improving privacy without changing how you use your phone.
For You :

For Android users who want a safer experience without added complexity, this is one setting worth turning on and never looking back.