
Table of contents:
Digimagaz.com – Apple has steadily expanded the role of AirPods beyond music and calls, turning them into multipurpose accessories that integrate deeply with the iPhone. With iOS 26, Apple has taken a notable step forward by allowing certain AirPods models to function as a wireless microphone when recording video in supported camera apps. For everyday users, journalists, educators, and casual content creators, this update changes how portable video recording can be approached.
Below is a clear, practical guide on how to use AirPods as a video mic on an iPhone running iOS 26, along with important limitations, audio settings, and real-world use cases to help you decide whether this feature fits your needs.
Why This iOS 26 Feature Matters
Until now, AirPods could handle voice input for calls, voice notes, and meetings, but the iPhone’s native Camera app relied on the device’s built-in microphones during video recording. That meant audio quality dropped quickly if the phone was placed at a distance or mounted on a tripod.
For You :
iOS 26 closes that gap. When enabled, supported AirPods can capture your voice wirelessly while the iPhone records video, effectively acting like a lightweight lavalier microphone. This is especially useful for:
- Talking-head videos and tutorials
- Classroom or presentation recordings
- Social media clips filmed from a distance
- Outdoor videos where phone placement is limited
It does not replace professional audio equipment, but it lowers the barrier to better sound quality for many users.
Devices and Requirements
Before setting expectations, it is important to understand that this feature is not universal.
What You Need
- An iPhone updated to iOS 26
- One of the following AirPods models:
- AirPods 4
- AirPods Pro (2nd generation)
- AirPods Pro (3rd generation)
Regional Availability
Apple has limited this feature by region, and availability is not global. Some regions, including parts of the European Union, do not currently support AirPods as a video mic in the Camera app. If the settings described below do not appear on your device, regional restrictions or hardware compatibility are the most likely reasons.
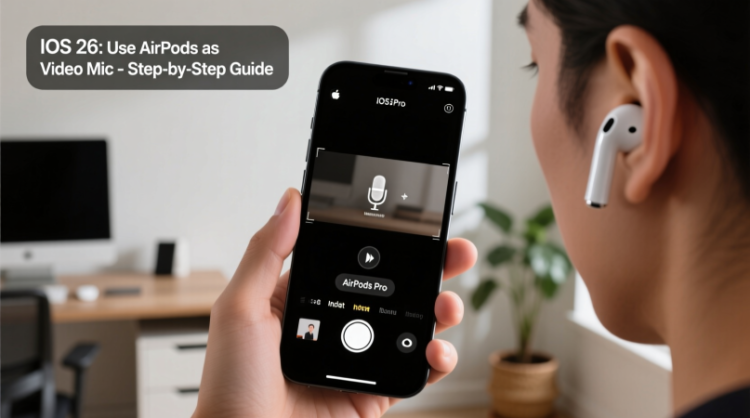
How to Set Up AirPods as a Video Mic on iPhone
The setup process only needs to be completed once. After that, selecting AirPods as your audio source becomes a quick in-app choice.
Step 1: Enable Camera Remote for AirPods
- Wear your AirPods and open the Settings app on your iPhone.
- Tap the name of your AirPods at the top of the menu.
- Scroll down and select Camera Control.
- Tap Camera Remote and choose either:
- Press Once, or
- Press and Hold
Each option temporarily disables certain AirPods gestures while the Camera app is active. Choose the option that best fits how you typically use your AirPods.
Step 2: Open Camera Controls
- Launch the Camera app.
- Swipe to Video mode.
- Swipe down on the screen to open the Camera Control Center.
- Tap Camera Controls at the top.
This menu is new to iOS 26 and centralizes audio and video input options.
Step 3: Select AirPods as the Audio Input
- Under Audio & Video, tap Audio Input.
- Select your AirPods from the list.
At this stage, your iPhone will route video audio through your AirPods instead of the built-in microphones.
Step 4: Choose the Right Microphone Mode
iOS 26 also gives you more control over how sound is processed. Available mic modes include:
- Automatic: iPhone selects the best mode based on surroundings
- Standard: Neutral audio processing
- Voice Isolation: Reduces background noise and emphasizes speech
- Wide Spectrum: Captures more ambient sound
For spoken content, Voice Isolation is often the most effective choice. For environmental or documentary-style clips, Wide Spectrum may produce more natural results.
Step 5: Start Recording with AirPods
Once everything is set:
- Press or press and hold the AirPods stem (based on your earlier choice) to start recording.
- The iPhone begins video capture while the AirPods handle audio.
While recording, some normal AirPods features are disabled. This is expected behavior and ends when you leave the Camera app.
Audio Quality: What to Expect
AirPods are designed primarily for listening, not professional recording. That distinction matters. Compared with the iPhone’s built-in microphones, AirPods can improve vocal clarity when the phone is farther away, but they still fall short of dedicated wireless microphones.
Strengths:
- Cleaner speech at moderate distances
- Consistent audio when moving
- No extra hardware required
Limitations:
- Less dynamic range than pro mics
- Wind noise can still be an issue outdoors
- Not ideal for interviews or multi-speaker setups
For creators who regularly produce video content, brands like DJI, Rode, and Boya still offer better audio fidelity and reliability. AirPods, however, provide a convenient middle ground.
When This Feature Makes Sense
Using AirPods as a video mic is most effective when convenience matters more than studio-quality sound. It is well suited for:
- Educators recording lessons
- Professionals filming short updates
- Casual creators posting to social platforms
- Anyone filming solo without extra gear
If audio quality is critical to your work, consider this feature a backup or a lightweight alternative rather than a full replacement.
Final Thoughts
iOS 26 quietly turns AirPods into a more versatile recording tool, blurring the line between consumer earbuds and entry-level audio gear. Learning how to use AirPods as a video mic gives iPhone users more flexibility without additional equipment, and for many everyday recording scenarios, that is enough.
As Apple continues to expand software-driven features across its ecosystem, this update signals a broader trend: small changes that significantly improve how people create content with the devices they already own.